Enroll as a Trainee 🔗
Learning Objectives
Link to the coursework
https://application-process.codeyourfuture.io/
Why are we doing this?
Enrol as a trainee to:
- claim course expenses to support your studies
- access unlimited Udemy for Business courses
- access GitHub Student Developer Pack
- access any further CYF courses
1. Complete your step submission
This is the same as in ITD. Everyone should do this, even if you are not eligible to enrol as a Trainee. You will do this every module:
- Go to https://programming.codeyourfuture.io/onboarding/success/
- Check off the learning objectives
- Make a new issue on your Coursework Planner: https://github.com/YOURGITHUB/My-Coursework-Planner/issues/new
- On this issue, add links to all the evidence asked for on the module success page
- Submit a link to this issue on the CYF Course Platform (sometimes called “the dashboard” by volunteers)
2. Take the Duolingo test and get your certificate
If you already have a Duolingo certificate from less than two years ago, you can use that - you don’t need to do the test again.
3. For this onboarding module only:
- Complete this enrollment form.
- If you hit a blocker write to pastoral@codeyourfuture.io if it’s private, or post on Slack if it’s not private
Maximum time in hours
.5
How to get help
If you hit a blocker and it’s something private, write to pastoral@codeyourfuture.io Otherwise, post on Slack. Encourage and support each other to complete onboarding!
How to review
You will receive your enrolment by email.
Interview Introductions
Learning Objectives
Almost every job interview will require you to introduce yourself. This usually happens towards the beginning of the interview when the interviewer asks you a question such as “Tell me about yourself?”. Being able to answer this question effectively is a crucial employability skill. It’s your chance to sell yourself and make an amazing first impressions. Like many interview questions, this question needs to be handled in a certain way.
Your introduction should be short but not too short, ideally around 1-2 minutes.
You don’t need to give a summary of your whole CV or explain the finer details of your favorite project. It should be a sales pitch that tells the interviewer the exact things that make you perfect for this role. It can be easy to go off on a tangent when you’re nervous so make a plan and stick to it.
Being too concise is a problem too. This is an opportunity to really sell yourself. Answering this question with just a few sentences wastes that opportunity.
It’s important to match the introduction to the job. This means emphasizing the skills, experiences & interests that make you perfect for it. It is good to have a stock introduction but it will need tweaking for different jobs.
It’s also important to show your passion for the job. The IT jobs market is very competitive. Showing that you are incredibly passionate could be a unique selling point for you.
One way of structuring this is by using the Present-Past-Future model:
Present: Start by briefly mentioning your current role or what you are doing at the moment (eduation, job, etc.). Give an overview of your responsibilities.
Past: Mention your relevant experience, skills, or education. Focus on achievements and how they shaped your current professional identity.
Future: Highlight what you want to do next and why you’re excited about this opportunity.
Start thinking about how you would construct an introduction for yourself. It may be useful to review some reputable external resources such as Indeed to get different perspectives and see examples.
Functions
Learning Objectives
When we are writing programs we often find ourselves needing to do the same thing over and over again. Think back to our password checker from the previous sprint: there are lots of places where you need to enter a password!
We could re-write the code to check a password every time we needed to use it but that wouldn’t be very efficient. It would take a long time to write and there’s a chance we could make a mistake and introduce a bug. It would be much easier if we could write the code once and reuse it anywhere it was needed.
This applies to any repeated process. Let’s look at how we can round a decimal to the nearest whole number.
Reusing instructions
There is no operator for rounding a number in JavaScript, but we will want to round numbers again and again. We can use a function to do this. A function is a reusable set of instructions.
We don’t need to declare this function ourselves. JavaScript comes with many built-in functions, ready for us to use, and rounding is so common that there is already one for it: Math.round.
Functions usually take inputs and then apply their set of instructions to the inputs to produce an output. Math.round takes a number as an input and produces the nearest whole number as its output. Because the number is an input, and not fixed inside the instructions, Math.round can round any number we give it, not just 10.3.
✍️Exercise: Using a function
Create a new file to work in and add the following line:
console.log(Math.round);Take a look at the output in the console:
[Function: round]
This is telling us that Math.round is a function.
Calling a function
For our function to work, we need Node to read the instructions and execute them. Execution simply means the computer will run the code with the instructions in it. Update your code to add some extra information.
console.log(Math.round(10.3));Notice the ( and ) brackets after the name of the function and a number inside the brackets. These brackets mean we are calling the function. The number inside the brackets is the input we’re passing to the function.
📖Definition: Calling a function
Math.round(10.3) is a call expression; read this as:
“apply the set of instructions for Math.round to the number 10.3.”
If we type Math.round(10.3) then we get the result 10. So we say that Math.round(10.3) returns 10.
A call expression is an expression which evaluates to the value returned by the function when it is called. So the expression Math.round(10.3) evaluates to the value 10.
If we assign that expression to a variable, or use it in a string, we’ll get the value 10. We can use this value just like any other that we store in a variable.
✍️Exercise: Calling functions
- Update your code from earlier to store the result of calling
Math.round(10.3)in a variable and print the variable usingconsole.log - Create a second variable to store the result of
Math.round(4.2)and print the sum of the two values.
Example solution:
roundedNumber = Math.round(10.3);

console.log(roundedNumber);firstRoundedNumber = Math.round(10.3);
secondRoundedNumber = Math.round(4.2);
console.log(firstRoundedNumber + secondRoundedNumber);Planning a function
Learning Objectives
When we write code we are doing it to solve a problem. Before we start writing it’s important to think about the problem in simple terms. For our password checker:
Given a password entered by a user, I want to check if it is valid or not
The password we picked was secretword123, so if the user types that we want our program to behave a certain way. If they type anything else then it should do something different.
Planning the process
In the previous section we used the Math.round function to round decimals to whole numbers. When we called the function a set of instructions were carried out and we got our result. The value of the result changed when we changed the value of the input.
The Math.round function was provided for us as part of the core JavaScript language. We are able to use it but we didn’t have to think about what the instructions were. Checking passwords isn’t a core part of JavaScript so we will have to define the instructions ourselves.
Before we think about how the code should be structured we need to think about the overall process. We think about the input we will receive, what we want to happen and what the output should be using the Given-When-Then structure:
- Given an input
- When I execute some code
- Then this should be the result
These steps can be as simple or as complex as necessary. In our example:
Given a password entered by a user
When I compare it to the variable containing the correct password
Then the program should tell me if the user entered the correct password or not
Writing pseudocode
Once we have defined the criteria for our function we can start thinking about how the code should look. We want to be sure we have a good understanding of what we should be writing before we start, so we will plan our function using pseudocode.
📖Definition: Pseudocode
if and else to show which structures we need but we use plain English as much as possible.We’ll also need to create a new file to work in. We’ll call it passwordCheckerFunction.js.
We’re going to use comments to describe what each section of code should do. As we write the function we’ll leave the comments in place to act as a guide then delete them when we’re finished. We don’t need to be too specific with coding terms here, we want to concentrate on the process.
// Already have the password stored in a variable
// Receive the value which the user entered
// Compare the two values
// If they match print "Correct password entered"
// If they don't match print "Incorrect password, please try again"
Now we have a plan, let’s look at how we define our new function.
Declaring functions
Learning Objectives
We have our pseudocode from the previous section and it’s time to write our first function.
// Already have the password stored in a variable
// Receive the value which the user entered
// Compare the two values
// If they match print "Correct password entered"
// If they don't match print "Incorrect password, please try again"
It can be tempting to jump straight to the interesting bit, but just like any other set of instructions we need to start at the beginning. In this case we need to declare a variable to store our password.
// Already have the password stored in a variable
const password = "secretword123";

// Receive the value which the user entered
// Compare the two values
// If they match print "Correct password entered"
// If they don't match print "Incorrect password, please try again"
To create our function we need to use a function declaration. In JavaScript we declare functions like this:
function checkPassword(input) {}The function declaration consists of the following syntactic elements:
functionkeyword - begins the function declarationcheckPassword- the name of the function()- any input to the function will go between these parentheses. We still need them if a function has no input, we just leave them empty. We call these inputs parameters.{}- the body of the function is written inside the braces. The code we want to execute will be written here.
📝Functions in other languages
We can add our function declaration to our code.
// Already have the password stored in a variable
const password = "secretword123";

// Receive the value which the user entered
function checkPassword(userInput){
  // Compare the two values
  // If they match print "Correct password entered"
  // If they don't match print "Incorrect password, please try again"
}
We changed a couple of things here:
- Instead of
inputwe named our function’s parameteruserInput. Just like any other variable, we want to use meaningful names which tell us what the value represents. - We wrapped the braces
{}around the other steps in the pseudocode. These lines say what we want the function to do, so we place them inside it. - We indented those lines inside the braces. Indentation gives us a visual indication of where a block starts and ends.
Now it’s time to fill in the detail of what our function will do! We have already seen how to do this using an if statement in the last sprint.
✍️Exercise: Complete the body of the function
Add the code to complete the steps described by the pseudocode. Remember to line the comments up with the code!
Example solution:
// Already have the password stored in a variable
const password = "secretword123";

// Receive the value which the user entered
function checkPassword(userInput){
  // Compare the two values
  if (userInput === password) {
    // If they match print "Correct password entered"
    console.log("Correct password entered");
  } else {
    // If they don't match print "Incorrect password, please try again"
    console.log("Incorrect password, please try again");
  }
}
Now we have defined our function we can call it in exactly the same way as we called Math.round() before. Try it with different inputs to check that it works!
checkPassword("secretword123");
// "Correct password entered"

checkPassword("WrongGuess99");
// "Incorrect password, please try again"
📖Definition: Arguments
When we call a function we have a special name for the values we place in the parentheses: arguments. When we provide a value as an input we are passing an argument to the function.
There is an important distinction between parameters and arguments:
- A function’s parameters are the placeholder values used when we define the function
- A function’s arguments are the actual values in the program when we call the function
Scope
Learning Objectives
At the moment our password checking function does what we need it to but is quite limited. The only way it can let us know if the input was correct or not is by printing a message, but what if another part of the program needs to know?
For that to happen we will need to store the response in a variable, so let’s make some changes to our code:
const password = "secretword123";

function checkPassword(userInput){

  let response;

  if (userInput === password) {
    response = "Correct password entered";
  } else {
    response = "Incorrect password, please try again";
  }
}
Now we can call our function then try printing response:
checkPassword("secretword123");

console.log(response);
It looks like we have a problem though…
ReferenceError: response is not defined
We definitely did define response though, it’s right there above the if statement! It’s the only variable which throws this error: if we print password the value will be displayed. So why does it work for one and not the other?
We get an error because of the variable’s scope. Scope determines where a variable can be accessed from in our code. When we define passwordChecker we also define a local scope - the block of code enclosed inside passwordChecker’s function body. This means any variables we declare inside that local scope can only be accessed within the same block. If we attempt to reference a variable from outside the scope where it was declared we get a ReferenceError.
The response variable is declared inside passwordChecker’s local scope so when we try to print it the ReferenceError is thrown. The password variable is declared outside the function’s local scope so we can access it without the error being thrown.
Global Scope
There are two ways in which we could fix this. The first is to move the response declaration outside of the function. That means it is no longer within the function’s scope but that could cause some problems for us in future. What happens if the code in the function isn’t executed? Our variable would always have the value undefined and we may not be prepared to handle that.
The second is to remove the declaration altogether and handle declaration and assignment at the same time in the if block. TRy it now and see what happens!
const password = "secretword123";

function checkPassword(userInput){
  if (userInput === password) {
    response = "Correct password entered";
  } else {
    response = "Incorrect password, please try again";
  }
}

checkPassword("secretword123");

console.log(response);
No error, and the correct value is printed. So why does this work?
When we declare a variable using const or let it gives the variable local scope. When we don’t use a keyword the variable has global scope instead. Now there are no restrictions, the variable can be accessed from anywhere. That doesn’t sound very secure though, does it?
We have a stand-off: on one side our code is secure but we can’t access the value we need, on the other we can access the value but so can everything else. We need to make some changes to our function to fix this.
Returning from a function
Learning Objectives
We need a way to access the value that is created inside checkPassword. To access values created inside functions, we use the return keyword. When we return something from a function we make it available at the point the function was called.
Let’s undo our global variable changes from the last section and add a return statement to the function:
const password = "secretword123";

function checkPassword(userInput){

  let response;

  if (userInput === password) {
    response = "Correct password entered";
  } else {
    response = "Incorrect password, please try again";
  }

  return response;
}
We haven’t quite fixed everything though. If we call the function and try to print response like before we’ll still get a ReferenceError.
Using the output
We sometimes refer to the value returned by a function as its output. We can store that output in a variable.
const output = checkPassword("secretword123");Now the value returned by our function is stored in the output variable and can be handled just like any other variable. Let’s try printing it to check everything worked:
console.log(output);
// "Correct password entered"
Success!
Parameterising a function
Learning Objectives
Our checkPassword function is nice and reusable now with its ability to check any value we pass to it as an argument, but in practice we will see lots of functions which need more than one piece of information to do their job. How we provide this information is critical. In a future sprint we will look at ways of testing our code to ensure we have set everything up correctly but we can avoid a lot of problems by paying close attention to how we use our functions.
Let’s create a new function to work with for this example. In a new file let’s define a function which will print a greeting for someone with a different message depending on what time of day it is.
function greet(timeOfDay, name){
  console.log(`Good ${timeOfDay}, ${name}.`);
}
Ordering
If a function expects to receive two pieces of information then it expects to receive them in the order they are defined. In our example we have said the first argument greet receives will represent the timeOfDay parameter and the second argument will be for name. We can test it to see what happens:
greet("afternoon", "Colin");
// "Good afternoon, Colin."
✍️Exercise: Changing the order of arguments
Try to predict what will happen if we swap the order of the arguments when calling the function.
Answer:
greet("Colin", "afternoon");
// "Good Colin, afternoon."
As far as the function is concerned everything is fine: it needed two pieces of information and it got two, so it’s happy. The output doesn’t make sense to us as users though!
The output may not make much sense, but it could be worse. What might happen if one of the arguments was expected to be a number? If we’re not careful when passing arguments we can cause errors by trying to do something we’re not able to do to a value.
Wrong number of arguments
Some languages are very strict about passing the right number of arguments to a function when it is called. JavaScript is not one of those languages. JavaScript is quite forgiving and will do its best with what we give it.
✍️Exercise: Missing arguments
Try to predict what will happen if we omit the second argument when calling our function. Hint: think about the value of a variable which we declare but never initialise.
Answer:
greet("afternoon");
// "Good afternoon, undefined."
When the function is called timeOfDay and name are both declared but we only have a value to assign to timeOfDay. name will remain undefined while the code is executed.
Now predict what will happen if we omit the first argument.
Answer:
greet("Colin");
// "Good Colin, undefined."
Remember that ordering matters. The interpreter will assign the first value it receives to the first parameter, it doesn’t know there was meant to be something else there first.
✍️Exercise: Extra arguments
Try to predict what will happen if we pass a third argument to our function.
Answer:
greet("afternoon", "Colin", 2026);
// "Good afternoon, Colin."
The function only expects two pieces of information and once it has them it doesn’t care about anything else we give it. Remember about the ordering though! It only expects two values and it will take the first two values, whatever they are.
Default values
There are many reasons why we might be missing a piece of data which is actually quite important for our program. In production code we would usually have several checks in place to ensure we didn’t even try to call our function if something was missing but it never hurts to have another one.
In our greet example we were able to get away with the missing value because we can still print undefined but that won’t always be the case. We can’t add two numbers together if once of them is undefined, for example. To help avoid this we can assign default values to parameters when we define a function. If a function expects to receive a value when it is called but doesn’t it will substitute the parameter’s default, avoiding the value being undefined.
✍️Exercise: Assigning defaults
Research how to assign default values to a parameter and update the function definition so that it prints “user” instead of “undefined” if the name argument is not passed. Hint: The functions page of the MDN docs could be a good place to start!
Solution:
function greet(timeOfDay, name="user"){
  console.log(`Good ${timeOfDay}, ${name}.`)
}
Refactoring
Learning Objectives
Our checkPassword function is doing its job well but it’s getting quite long. We also need to think about how it will interact with other parts of an application.
Returning a string is fine when we’re printing an output to the console but it’s actually not that useful if we want to do something else with it in code. If another function wanted to use the returned value the workflow would look like this:
We make two comparisons in a row: we ask if two strings match, which produces a string, then we check that string to see what it says. That’s not very efficient. It would be much simpler if our password check gave a “yes” or “no” answer.
In programming we can use the boolean values true and false when asking yes/no questions like this. We can update checkPassword to return these values by refactoring it.
Editing our code
When we refactor code we make changes to its structure without changing how it behaves. In this example we will go slightly beyond what a typical refactor would involved because we will be changing the return values too, but our function will still be doing the same job. Let’s swap the strings for true and false.
const password = "secretword123";

function checkPassword(userInput){

  let response;

  if (userInput === password) {
    response = true;
  } else {
    response = false;
  }

  return response;
}
Calling this function with different arguments will now return either true if the argument matches the value stored in password or false if it doesn’t. So far so good! By making response a boolean we have made our code easier to understand, but also made it less likely that we will make a mistake by trying to match a complex string.
We could go even further and reduce our function’s length. Our if statement is evaluating an expression, and if it evaluates to true we are setting response = true. Likewise if the expression is false. Why not just store the result of the evaluation in response? That would get rid of three lines of code!
function checkPassword(userInput){

  const response = userInput === password;

  return response;
}
💡Understanding changes
We have also switched to use const in the variable declaration since we don’t need to reassign it any more. We can go even further, though. We declare the response variable then immediately return it without using it for anything else. Since we are done with it so quickly, why bother with the variable declaration at all? Why not go straight to returning the expression?
function checkPassword(userInput){

  return userInput === password;

}
Now it’s even shorter! If we really wanted to we could get the whole thing on one line but we’ll leave that for now. We’ll find out how we can do that with a different way of declaring functions in a future module.
There is a trade-off here. We have made our function much shorter but this often happens at the expense of readability. Don’t be tempted to refactor too far and make things difficult for anyone (including yourself) reading your code in the future.
Throwing Errors
Learning Objectives
TODO:
- Discuss good vs bad ways for something to fail
- Construct a function to validate an input, eg.
checkOverMinCharacterLength(stringToCheck) - Have it throw an error if condition not satisfied
- Example of using
catchto handle the error?
Breaking Down a Problem
Learning Objectives
TODO:
- Set up the workshop
- Relate to previous page on pseudocode if possible
Undoing a Commit
Learning Objectives
TODO:
- Add some extra content to an existing repo (education blog?)
- Revert a commit and examine history
- Reset to a previous commit and examine history
One of the great things about Git is that it captures the complete history of a project. Because we know exactly what was changed with each commit we are able to deconstruct the changes made to a project and revert it to a previous state. We can jumping back and forth between versions if we need to see what our project looked like before some changes were made.
We can also undo those changes, acting as if they never actually happened. This is particularly useful in a situation where we accidentally commit something we didn’t mean to, which can easily happen!
Undoing a commit
Let’s revisit the educational blog we looked at in Sprint 1. Open the folder in VSCode and take a moment to refamiliarise yourself with the files.
Let’s imagine a world where we’re putting this page online using a platform like GitHub Pages. usually we need to include some sort of configuration information when we deploy an application, typically things like GitHub urls to load content from or passwords for third-party services. We’re going to add a fake file which will store some credentials for our imaginary deployment.
Create a file called passwords.json at the directory’s root and add the following object to it:
{
  "db": "storage_is_awesome",
  "apiKey": "acbd1234"
}
We would usually want to make a commit at this point, so switch over to the source control tab and commit this new file.
We may have just made a mistake though. Things like passwords and API keys are typically personal to a particular user, do we want to share them with the entire team? What if our repository is public, do we want them visible to everyone on the internet? We need to undo this commit before our details get shared!
There are multiple ways of doing this with Git but not all are supported natively by VSCode’s source control tools. In VSCode we can only undo the most recent commit but later we will see how to apply this to any commit.
Click the dots next to the repo name in the source control tab. From there click Commit --> Undo Last Commit.
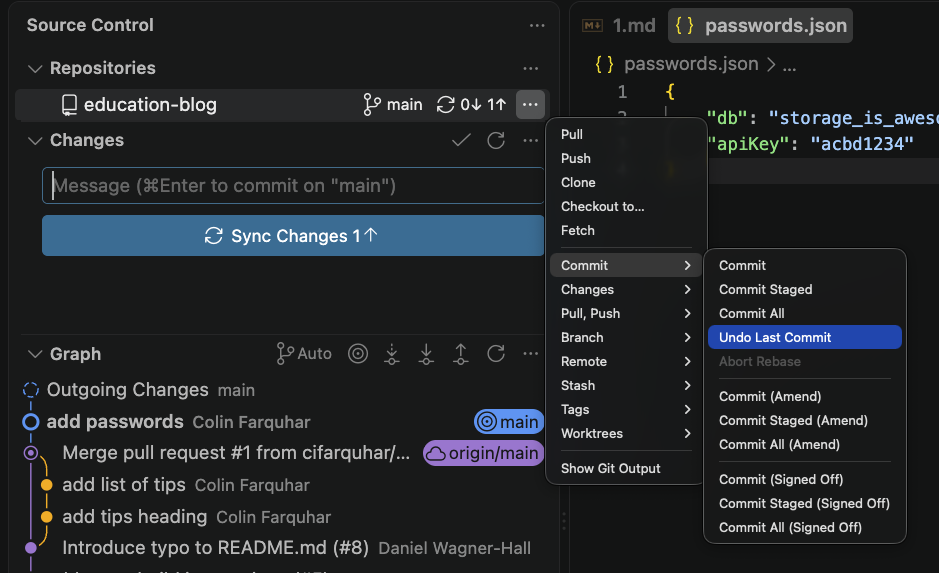
After clicking the button you will see the changes made in the commit have been returned to staging. From here you can remove anything that shouldn’t be there and commit again, or remove everything. The files themselves and the changes made are unaffected, it is only the commit which is deleted.
VSCode is fairly limited here - it can only undo the last commit. If another commit has been made since the one we want to undo we have a problem. Git does have functionality which enables us to undo any commit though, which we will look at in a later section. For now let’s take a look at a way of avoiding this happening at all.
Ignoring Files
Learning Objectives
TODO:
- Create an additional file in a repo - do not commit
- Explain why we may not want to commit it
- Create
.gitignore - Use
git status(or equivalent in VSCode) to show file is being ignored
Backlog
Learning Objectives
In software development, we break down complex projects into smaller, manageable parts, which we work on for a week or two. These periods are called “sprints.”
A sprint backlog is like a to-do list. It lists what the team has decided to work on this sprint. It’s chosen from a larger list, usually called the “product backlog,” which holds the entire project to-do list.
In this course, the backlog is a set of work designed to build understanding beyond the concepts introduced in the course prep. For your course, we have prepared a backlog of mandatory work for each sprint. You will copy these tasks into your own backlog. You can also add any other tickets you want to work on to your backlog, and schedule all of the tasks according to your own goals and capacity. Use your planning board to do this.
You will find the backlog in the Backlog view on every sprint.
Copy the tickets you are working on to your own backlog. Organise your tickets on your board and move them to the right column as you work through them. Here’s a flowchart showing the stages a ticket goes through:
🕹️Backlog (30 minutes)
- Find the sprint backlog
- Copy your tickets to your own backlog
- Organise your tickets on your board